How to Verify a Domain on Facebook Tutorial
Advertising is in a constant state of change and development. Facebook has changed the way they collect events on mobile devices to cooperate with the new iOS 14.5 update. Facebook needs to make sure that the domain you’re using to advertise is verified to an account. With this enabled, companies can delegate advertising access to select advertisers in an attempt to bring accountability into date collection. Luckily this step is very easy as long as you have website access, DNS access, or web hosting access.
How to Verify
Verification is a simple three to four step process depending on the option selected, however first you will need to access the correct Business Manager account.
Step One: Access Business Manager
To access this you need to first open up Facebook Business Manager. At the time of writing this Business Suite is available however has a number of bugs which make Business Manager preferable. In order to reach Business Manager first go to https://business.facebook.com/ and sign in. If in the upper right hand corner it says Business Suite, you will have to go down to the lower left corner and select Give Feedback. From there it will let you select that you want to revert to Business Manager. A dialog box will also appear asking to give feedback on the Business Suite, however that is not needed and you can just click out of it. From there you should be reverted to Business Manager, at least for the moment. You can always revert back to Business Suite at any time.
Step Two: Select the Business
Select the business for which you wish to verify the domain. Keep in mind you can always share domain access across multiple businesses if necessary. If a business is not created we have a full tutorial on setting up a Business account soon but for now you can just select Add Business and follow the steps listed.

Step Three: Access Business Settings
Now that the business is selected we need to access the Business Settings page. To do this, select the gear icon on the bottom left corner of the screen. This option should open a page called Business Settings.

Step Four: Select Brand Safety
Once on the Business Settings page there will be a scroll bar on the left hand side that we will use to scroll to Brand Safety. Selecting this will bring up a new window, make sure Domains is what is selected.

Step Five: Add the Domain
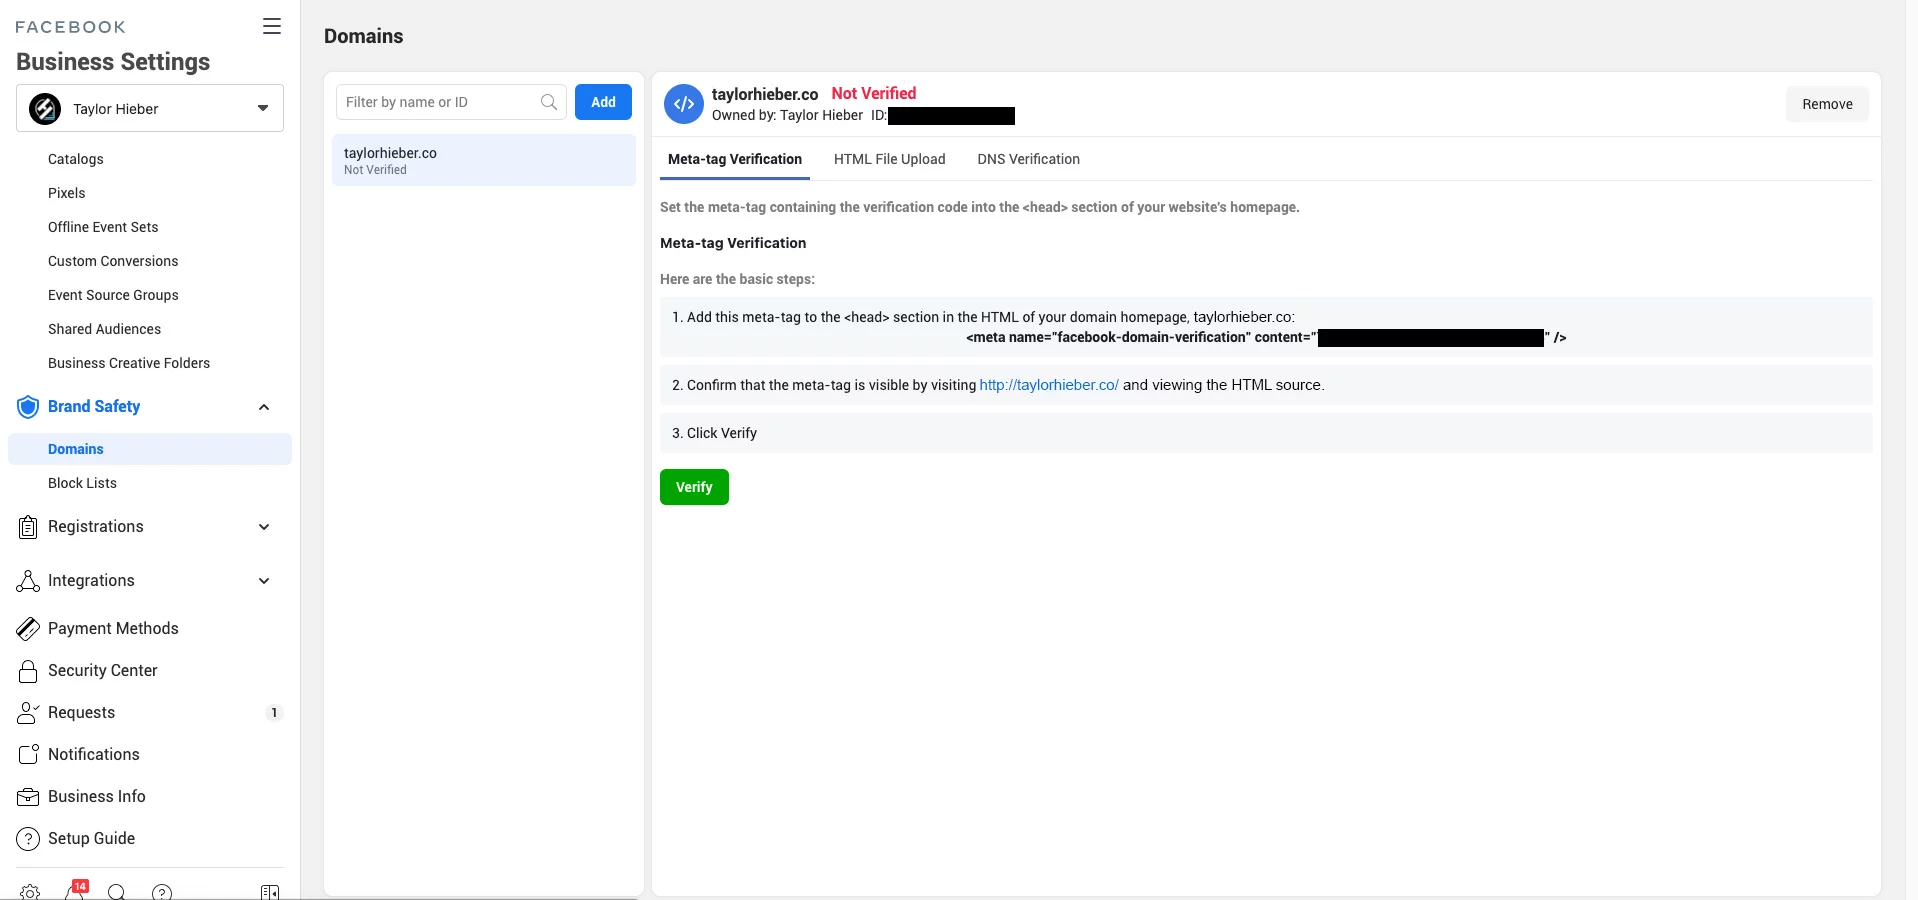
Up near the top of this page will be a blue button that says Add. Clicking this button will open a window asking you to add a domain. Simply type in the domain into the window and select Add Domain. This will enable the following options for you to verify the domain.

Important Things to Note Before Proceeding
Keep in mind Facebook will check the unsecure version of your site. In certain instances if the DNS is not properly routed or redirects are not properly set up this can cause issues with verification.
Also, I would recommend keeping the Facebook page up and opening a new tab to execute whichever of the three options you select as you will have to go back and forth between the two pages frequently.
Make sure whatever option you select is the one selected when you go to verify or else the verification will fail.
Meta-Tag Verification Method
Adding meta-tag code to the heading requires website access and the ability to edit HTML code.
Step One: Add the Generated Meta-Tag to the
Facebook will generate a meta-tag for you to insert into the head section of the HTML code before the first body section. Editing this will be dependent on the method in which the site was constructed. Usually I place this right after and Google Analytics tag codes.
Step Two: Clear the Cache and Confirm Meta-Tag Placement
I would recommend once you add in the meta-tag that you clear your cache on the site. From there, navigate to your home page and view the HTML source and search for the meta-tag. When you see it in the proper place you know you are good to go.
Step Three: Verify
Click the big green Verify button and let Facebook check the page for the tag.

HTML File Upload Method
Arguably the simplest method of verifying a domain as long as you have access to the hosting file explorer. Certain CMS’s may not let you have access to this such as SquareSpace and WIX. This method requires you to upload a HTML file to your site’s root directory.
Step One: Download the Verification File
Facebook will generate a custom HTML file with a random string of characters. Simply select the HTML Verification File and the file will download directly to the default location on your computer.

Step Two: Upload HTML File to the Root Directory Folder
Access the root directory of your site. This most commonly will be through the cPanel File Manager of your host. Upload the HTML file you have previously downloaded into the root directory of the site. This directory should contain the index file (index.php, index.html or default.html) and is often named public_html, htdocs, www or wwwroot.

Step Three: Confirm Page Visibility
Navigate to the steps on Facebook. A link should be provided that you can click to check that the page exists and is verifiable.

Step Four: Verify
Click the big green Verify button and let Facebook check the page for the file.
DNS Verification Method
Step One: Login to the Domain Registrar and Access the DNS
Log on to your domain registrar. Navigate to the DNS settings of the domain in question and open those up.

Step Two: Add the Generated TXT Record to the DNS
A TXT record will be generated in bold that can be clicked on and copied to the clipboard. Create a TXT record in your DNS and input the code under the Value section of your DNS.

Step Three: Add @ to the Host Field
If your DNS requires something in the Host field just add either the @ or the domain itself depending on the pre-existing records.

Step Four: Verify
Click the big green Verify button and let Facebook check the page for the TXT record. Keep in mind this can take up to 72 hours depending on your DNS settings.
Conclusion
Locking down the domain of a company for advertising purposes is something that comes in handy it becomes a necessity. The move to making domain verification mandatory doesn’t come as a surprise. Facebook as a whole wants a more accountable system for advertising, and this was one of many solutions. As stated previously doing this verification is required in order to enable server events for mobile event data collection. Check out our tutorial on setting up a Pixel to handle this data coming soon.


